Happy Leap Year! Today we are grateful for an extra day in February. Happy birthday to all of the Leap Year babies, too.
Did you hear about our new GraceBox subscription, launching soon in April? We mad an announcement in today's eNewsletter.
Enjoy our March kit reveal!
Have a splendid month of scrapbooking and memory keeping.
Trina

Monday, February 29, 2016
Sunday, February 28, 2016
Sunday Sketch with Suse
Hey gang! I'm with you for today's Sunday Sketch - hope you'll feel inspired to play along.

This time we've got a two photo layout where most of the action is on the right hand side of the page. I didn't have photos that were quite the right orientation, so mine's a little different, but here's what I came up with...


So now it's over to you! Play along and you could win a $5 gift certificate; all you need to do is to create a project based on this sketch and upload it to CTK Gallery by next Saturday (make sure you include the date of the sketch in the title). Hope you really have fun!

This time we've got a two photo layout where most of the action is on the right hand side of the page. I didn't have photos that were quite the right orientation, so mine's a little different, but here's what I came up with...

I couldn't squeeze my title in the right spot either, so a couple of small alterations were called for! But I love the end result so much: it really captures the 'children's party'-feel I was going for.


So now it's over to you! Play along and you could win a $5 gift certificate; all you need to do is to create a project based on this sketch and upload it to CTK Gallery by next Saturday (make sure you include the date of the sketch in the title). Hope you really have fun!
Saturday, February 27, 2016
3 to Inspire with Missy

Hey, friends! Missy here to share this week's "3 to Inspire" Challenge :)
You are welcome to create a layout or a PL spread, but you must include all 3 prompts on your project. Here is what you need to use on your project:
1. Use paint, ink or mist (as much or as little as you'd like...I used watercolor and Color Shine).
2. Use hand stitching or machine stitching.
3. Use something fussy cut from patterned paper.
Here is what I created using the 2016 February "Stories" Main Kit. I mainly used pieces from the Maggie Holmes Bloom cut apart sheet and created a grid design. I used watercolors on the background and added a large die cut butterfly. I used lots of bits & pieces from the Pink Paislee collection, and I fussy cut those cute hearts from the Studio Calico paper.

I love these fun tab pieces from Pink Paislee! They are perfect for layering and adding details to your layout. This fun doilie gives such a feminine look to a page. I used a blue colored gelato here to add a hint of blue to this side of the layout. I also used my sewing machine here with some shiny gold thread.

I machine stitched through this black piece here, and I used one of those fussy cut hearts here. I added even more gold thread just because I love it! This fun cork piece was the perfect touch to add on top of the cute frame.

Hello adorable puffy stickers! I am in love with this cluster...Pink Paislee knocked it out of the park with these gorgeous stickers!

I have a process video for you if you'd like to see how I created this layout...I hope you enjoy it!
Now it's your turn! Use the 3 prompts to create your own project, share it with us here in the gallery, and you will be eligible to win a small prize from the CTK Store. Make sure to include the date of the challenge in the title of your gallery submission. I can't wait to see what you create!
Thanks for stopping by, and happy scrappin'!
Missy :)
Friday, February 26, 2016
Pocket life sketch friday with Diane
Diane here with another Pocket Life Sketch Friday for you. Don't forget that we have a giveaway associated with the sketches at the end of this post.
I used the Citrus Twist Kits February Pocket Life kit for this week and it has plenty of sunshiny yellow goodness in it! I'm rather fond of my hand stitched title card, I find the stitching quite therapeutic and it doesn't really take that long for such a lovely end result.

Here is the process video of how this layout came together...
You can watch this video on YouTube or subscribe to my YouTube channel here.
And here are a few close ups...


And now for your Pocket Life Sketches ...

Thanks for visiting Pocket Life Friday, where every week we share PL sketches and a chance to win. For your chance to win, create a layout based on the sketches in this blog post, post your layout to our Gallery or our Facebook Fan Page by Friday, March 4th 2016. Be sure to include PL 02/26 in the title!
I used the Citrus Twist Kits February Pocket Life kit for this week and it has plenty of sunshiny yellow goodness in it! I'm rather fond of my hand stitched title card, I find the stitching quite therapeutic and it doesn't really take that long for such a lovely end result.
Here is the process video of how this layout came together...
You can watch this video on YouTube or subscribe to my YouTube channel here.
And here are a few close ups...
And now for your Pocket Life Sketches ...
Thanks for visiting Pocket Life Friday, where every week we share PL sketches and a chance to win. For your chance to win, create a layout based on the sketches in this blog post, post your layout to our Gallery or our Facebook Fan Page by Friday, March 4th 2016. Be sure to include PL 02/26 in the title!
Thursday, February 25, 2016
Pocket Life with Trina: Keeping It Simple
Hi, it's Trina here today sharing how I keep up and stay guilt-free with my 6" x 8" pocket page album using a simple approach, always working with a monthly Pocket Life kit and a scrapbooking kit and adding in a few extra embellishments either from my stash or from one of the monthly scrapbooking embellishment kits. My handy mists (love the new mini mist trios by Heidi Swapp!) are always within reach.
I have to say that I love how the Seven Paper holographic alphabet stickers from this month's pocket page kit pick up the colors that you place them by. You can see by the photos that the letters reflect the colors that I used for my pages.
Here is my newly finished spread for this week and I even made a small vertical shaker insert:

No. 1.
Have photos ready to print at home (or at a local pharmacy). I find myself shooting mostly with my smart phone these days and occasionally reaching for my Canon Rebel. I have 2 printers (my Canon and my Instax) so I can easily print my photos out when I sit down to scrapbook.
No. 2.
Print out only the photos you are going to use as you sit down to scrapbook. I only print out the photos I'm going to use. Piles of photos I haven't used make me feel guilty (and behind), so printing photos as I go keeps my Pocket Life fulfilling. A picture speaks a thousand words, so I tend to print out only the photos I love best. NOTE: I do not do one page per week, but work around fun outings, memories or events that run chronologically in my yearly pocket page album (except for my flashback page).
No. 3.
Focus on completing 1 (or 2) pages. When I sit down to scrapbook I focus on just 1 or 2 pocket pages that tie in around an event, a photo or a small group of photos. (For today's project I created a flashback page plus a page for a family outing last weekend. I do have a stack of my childhood photos that I know I will never make an album of. The flashbacks allow me to include older, unused photos and weave them in with current family life.)
No. 4.
Keep your scrapbooking time condensed. I keep my scrappy time short so I can work it into my life easily, typically finishing 1-2 pages within 1 hour and making a total of 2-6 pages per month.
No. 5.
Use PL cards for your layers. It's easy to use 3" x 4" journaling cards for layers. (In the "flying" page below I used two of the 3" x 4" cards from our February Pocket Page kit, then added in a piece of patterned paper and a tag to build more layers.)


Here are a few close-ups of my spread, including a homemade "silliness" shaker I made from cutting and folding a piece of vellum, tucking in colored card stock, filling the shaker portion with leftover sequins and stars (then stitching shut) and finally stitching a misted Heidi Swapp watercolor paper word on top:


Thank you for stopping by today. Have fun with your Pocket Life and remember to keep it simple and guilt free!
Trina
I have to say that I love how the Seven Paper holographic alphabet stickers from this month's pocket page kit pick up the colors that you place them by. You can see by the photos that the letters reflect the colors that I used for my pages.
Here is my newly finished spread for this week and I even made a small vertical shaker insert:

No. 1.
Have photos ready to print at home (or at a local pharmacy). I find myself shooting mostly with my smart phone these days and occasionally reaching for my Canon Rebel. I have 2 printers (my Canon and my Instax) so I can easily print my photos out when I sit down to scrapbook.
No. 2.
Print out only the photos you are going to use as you sit down to scrapbook. I only print out the photos I'm going to use. Piles of photos I haven't used make me feel guilty (and behind), so printing photos as I go keeps my Pocket Life fulfilling. A picture speaks a thousand words, so I tend to print out only the photos I love best. NOTE: I do not do one page per week, but work around fun outings, memories or events that run chronologically in my yearly pocket page album (except for my flashback page).
No. 3.
Focus on completing 1 (or 2) pages. When I sit down to scrapbook I focus on just 1 or 2 pocket pages that tie in around an event, a photo or a small group of photos. (For today's project I created a flashback page plus a page for a family outing last weekend. I do have a stack of my childhood photos that I know I will never make an album of. The flashbacks allow me to include older, unused photos and weave them in with current family life.)
No. 4.
Keep your scrapbooking time condensed. I keep my scrappy time short so I can work it into my life easily, typically finishing 1-2 pages within 1 hour and making a total of 2-6 pages per month.
No. 5.
Use PL cards for your layers. It's easy to use 3" x 4" journaling cards for layers. (In the "flying" page below I used two of the 3" x 4" cards from our February Pocket Page kit, then added in a piece of patterned paper and a tag to build more layers.)


Trina
Wednesday, February 24, 2016
Add a Large photo insert to your pocket pages

Diane here with a super quick and fun way to add a large photo insert to your Pocket Life Album using a 3x3 grid page protector. I used the February Citrus Twist Kits Pocket Life kit plus some sequins from the January kit. I love when the paper and embellishments bring out the colours in the photo!
You can either have your photo printed professionally at a larger size (mine is 9x12) or you can do what I do – which is to print my photo at home in sections on 4x6 paper using Photoshop. Then all you need to do is cut it into squares, slip them into your pockets and add a few embellishments.


Here is the process video of how this layout came together...
You can watch this video on YouTube or subscribe to my YouTube channel here.
Tuesday, February 23, 2016
Tips for capturing everyday moments with photographs
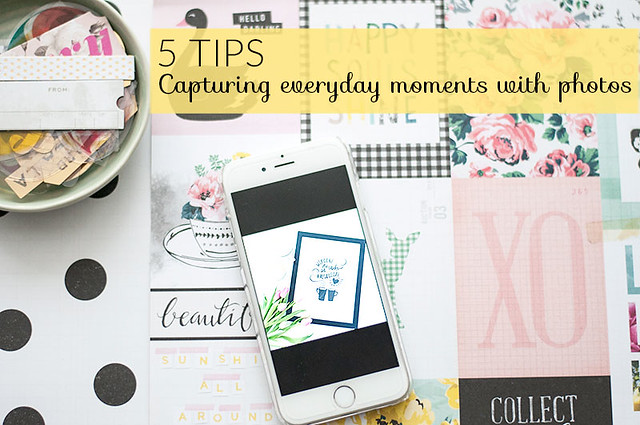
Hello! It's Kasia here today in another installment of Tuesday Tutorial!
Taking photos is such a big part of capturing everyday memories - honestly, documenting life has never been so easy. Most of us keep our cameras around all the time - thanks to technology development using the phone build in cameras is easy and brings great results!
I love grabbing my DSLR to take photos, play with light and different settings, but the truth is that most of the pictures which I use in my albums come from my iPhone camera. No shame in that!
In today's tutorial I'd like to share with you some tips and ideas to make the most of camera built in your phone and snap wonderful photos in any time and place!
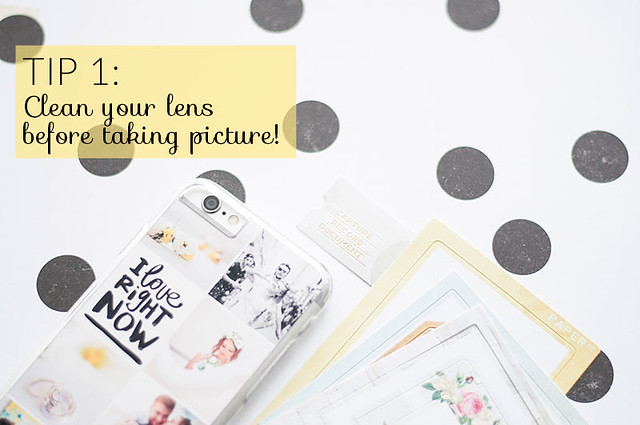
1. KEEP YOUR LENS CLEAN!
You can find the perfect light and amazing subject of your photograph (we will talk about it in a second!) but even the most yummy cupcake won't present itself great in the picture if your camera lens is dirty! I have a habit of wiping the camera's lens on my phone before snapping a picture and it helped to improve the quality of my photos a lot! So, keep your lens clean and you will see a big change in your pictures!
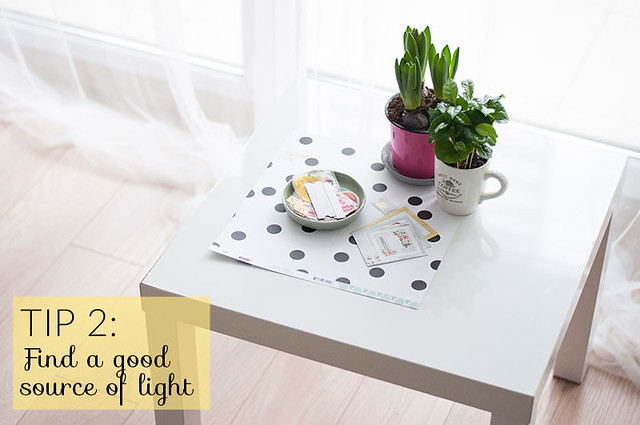
2. FIND A GOOD SOURSE OF LIGHT
And yes, daylight is best! Try to avoid harsh sun, look for places with some shade or if you shoot at home try to diffuse sharp sunlight with a light colored curtain.
Daylight helps to create natural look and the effects are very pleasing on the photo but we are talking about documenting life and life happens 24 hours a day - what to do when you need to shoot photo after dark? Still - search for a bright place at home, put the lights on and shot your picture. Most probably it will come out too yellow - you can help it with editing app, or... turn it to black and white! It's a great trick to cover up some color problems in the pictures!
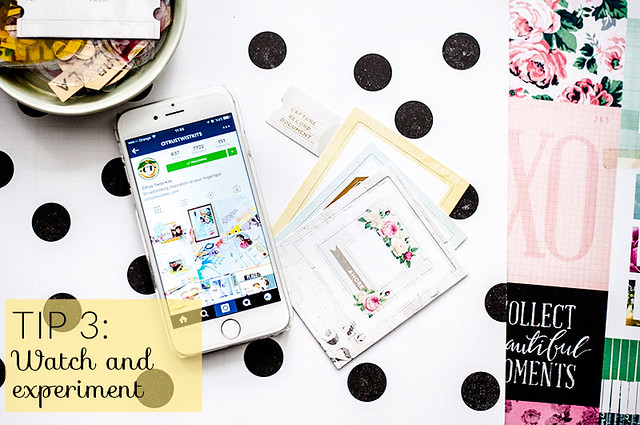
3. WATCH AND EXPERIMENT
We are so lucky to live in time when the knowledge is within easy reach. You can find great tutorials online and learn more about composition in photography, discover how to shoot your pictures against the light, watch the great photographers, search for everyday photography inspiration on pinterest and instagram.
Experiment with new stuff, new positions and angles when you shoot, try to come closer to your subject or shoot a photo from new perspective. Explore your phone camera and it's possibilities and it will most likely surprise you!
You can also invest in small extras that will change your phone photography - there is a selection of fun, attachable lenses that will help you extend the angle of your camera lens or even take a fish-eye like pictures!
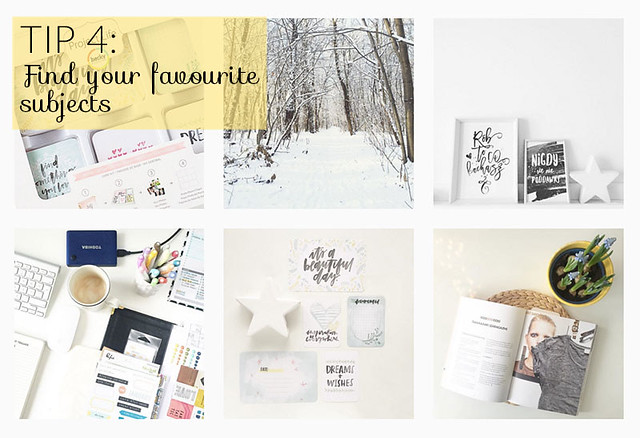
4. FIND YOUR FAVORITE SUBJECTS
Photographing everyday might be fascinating but to be honest, we all have days which feel like there is nothing to capture. To avoid long gaps in your photography (but also to practice your creativity!) don't give up on days like that. Try to develop some routine, find the subjects you love to photograph, capture in pictures even simple things- your outfit, crafty supplies, changing seasons, morning cup of coffee or lunch you pack to work.
Documenting small moments like that feels great and is a fun way to stay on track and see your progress and changes you make!
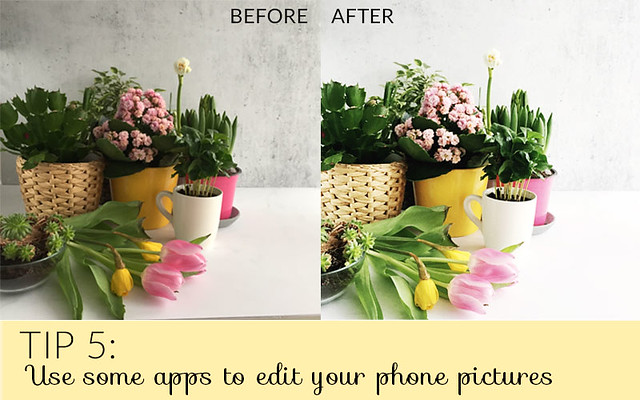
5. FIND YOUR FAVORITE APPS TO FOLLOW
Even if you decide to use only your phone to photograph and print photos don't forget that apps leave you a lot of creative room to experiment with different editing options!
My favorite app recently has been the Color Story- it has all my favorite features in it! I usually pick a filter which helps me to brighten up the picture a bit and if I want to apply more changes I play with curves, saturation and contrast. Editing picture allows me to make the colors pop and keep the white color really white.
Thanks to editing all my pictures same way I can create a unified and cohesive look inside the album.
I hope you enjoyed these 5 tricks and with spring days ahead you will feel brave enough to experiment more with cameras in your phone! Let us know in the comment which app is your favorite the photos and share any phone photography tips and experiences you have!
Monday, February 22, 2016
Hello Magic! Hello Simplicity!
Hello on Monday Everyone!
It's Mira Jurecka here to share the first day of January 2016 documented in my Pocket Album. I don't know about You, but for me that day was magical! We didn't have snow at the end of 2015 (this is winter and snow is must have here!) but on the first day of New Year we got A LOT of it! Like TONS! Everyone, absolutely everyone went for a walk on that day :) Including the three of us. It was actually the day, when our daughter saw the snow for the very first time in her life :) And during that walk I couldn't stop talking how lovey the aura is!
Today with this pocket page I would also like to share a very simple idea how You can work with the last bits and pieces from Your monthly kit. Each month if You effectively work with the kit You probably end up having a few stickers and embellishments that You don't know what to do with.
You might think: it's not enough for a layout or mini album, not even enough for a PL spread! This can be true, but not for everyone! :D
You can always use what's left to create very very very simple page and be happy about the results! Look what I did here:


As You see my work is really simple - only pictures and a couple of embellishments!
I filled every single pocket with one picture, printed a few words of journaling on the white card and used only a few embellishments to finish the page. It was made in 15 minutes, and You know what? I really like it's simplicity!

Once again let's see what's in here!
A few words created using Seven Paper Alphabet coming from February PL Kit, one stamp from the same kit (hello), "loving this" paper cut from the freebie sheet that You get with Your PL kit each and every month. And exactly two puffy stickers from February Sprinkles Kit. Additionally I have few tiny digital elements that I printed with my journaling. That's it!
Do I need more? What do You think?


You obviously don't need to kill each and every kit that You get using absolutely everything - if it works for You - fine. But if You have that need - remember that You can always create something beautiful - no matter how many elements You will add to Your page! And sometimes less is more :)
I hope You enjoyed my post today! Thank You for stopping by!
Be sure to leave a comment if You like it :)
And Have a fantastic week Guys!
Happy Monday!
It's Mira Jurecka here to share the first day of January 2016 documented in my Pocket Album. I don't know about You, but for me that day was magical! We didn't have snow at the end of 2015 (this is winter and snow is must have here!) but on the first day of New Year we got A LOT of it! Like TONS! Everyone, absolutely everyone went for a walk on that day :) Including the three of us. It was actually the day, when our daughter saw the snow for the very first time in her life :) And during that walk I couldn't stop talking how lovey the aura is!
Today with this pocket page I would also like to share a very simple idea how You can work with the last bits and pieces from Your monthly kit. Each month if You effectively work with the kit You probably end up having a few stickers and embellishments that You don't know what to do with.
You might think: it's not enough for a layout or mini album, not even enough for a PL spread! This can be true, but not for everyone! :D
You can always use what's left to create very very very simple page and be happy about the results! Look what I did here:


As You see my work is really simple - only pictures and a couple of embellishments!
I filled every single pocket with one picture, printed a few words of journaling on the white card and used only a few embellishments to finish the page. It was made in 15 minutes, and You know what? I really like it's simplicity!
Once again let's see what's in here!
A few words created using Seven Paper Alphabet coming from February PL Kit, one stamp from the same kit (hello), "loving this" paper cut from the freebie sheet that You get with Your PL kit each and every month. And exactly two puffy stickers from February Sprinkles Kit. Additionally I have few tiny digital elements that I printed with my journaling. That's it!
Do I need more? What do You think?
I hope You enjoyed my post today! Thank You for stopping by!
Be sure to leave a comment if You like it :)
And Have a fantastic week Guys!
Happy Monday!
Sunday, February 21, 2016
Sunday Sketch
Hello everyone! Jessy here with you today to share this week's edition of our Sunday Sketch Challenge! Here is the sketch we are working with:


Here's my layout:

I pretty much followed the layout of the sketch, but instead of 2 photos I chose to use only one and use a 3x4 PL card as replacement. I also added some pretty elements that I fussy cut from a patterned paper to balance the composition of the layout. The journaling at the bottom, I replaced with stickers and also CTK exclusive printables. Love how this layout turned out! Totally had so much fun with the February Main Kit.

I can't wait to see what you'll be creating with this awesome sketch!
To play along with this week's Sunday Sketch Challenge, create a layout based off of today's sketch, upload it to the Gallery with the date (2/21) of the challenge in the title of your project, and you will be eligible to win a $5 gift certificate to the CTK Store!
Thanks for stopping today!
Saturday, February 20, 2016
3 to Inspire with Michelle

Hello! Michelle here with this week's "3 to Inspire" challenge!
Your take on this challenge can be a layout or a PL spread and you must include all 3 prompts on your project. This is what I have for you today:
1. Make a one word title.
2. Use a punch.
3. Include something floral.
Here is my take using the February Main "Stories" Kit:

This was an easy challenge for me! I love, love floral patterns and the February Kit had plenty of options. The one word title was pretty appropriate for the subject of my story--spending quality time with my littlest. What really got me excited though, was the chance to dig through my punches. I picked my favorite butterfly punch and thought it went well with the floral, girly theme I had going on.

Now it's your turn! Use the three prompts to create your own project, share it with us here in the gallery , and you will be eligible to win a small prize from the CTK Store. Make sure to include the date of the challenge in the title of your gallery submission. Can't wait to see what you create!
Michelle
Friday, February 19, 2016
Pocket Life Sketch Friday with Karen
Hello. Welcome to Pocket Life Friday. Today I am sharing with you a pocket life layout that I created a few weeks ago and then a sketch for you to follow if you'd like.


Every month with the Pocket Life Kit and the Sprinkles or Embellishment kit, I create at least one layout maybe even stretching it to two layouts with a 6x8 full scrapbook page. I love them. This month I decided to do something different, I created a pocket within the layout, so that I could add as many photos as I wanted. Brilliant. I love how it turned out.
You can either stitch the pocket on or staple like I did.
Below is my layout that I'm sharing with you today.
Below is my layout that I'm sharing with you today.

Now here is the sketch.

Can't wait to see what you create. Have fun.
Karen xo
Thursday, February 18, 2016
Heart Punch, Three Ways
Now that you have all of those lovely photos from Valentines Day, I have a trick for you! I'm going to show you how to use one punch, three ways. You know I'm all about stretching a kit, and this is a great way to do that and incorporate a nice design at the same time.


You can see it in the bottom right card as well. All you need is a little backing and you're set! Using these pieces gives the cards some nice dimension. Bonus!


I just laid out a row of negatives and traced inside of them. Boom, mostly uniform sized hearts.
I wasn't worried about precision, but you could be precise with the stencil, no problem.

So the first way is to use the punch as it was intended. See below, hearts punched and painted.


The second way is to utilize the negative pieces your punch left behind.. I trimmed those patterned papers into neat little squares around the punched shape. Then layered them onto a card.

You can see it in the bottom right card as well. All you need is a little backing and you're set! Using these pieces gives the cards some nice dimension. Bonus!

The third way (and maybe even my new favorite way) is to use the negative as a stencil.

I wasn't worried about precision, but you could be precise with the stencil, no problem.

Easy, peasy, amiright? Guess I had hearts on the brain when I created these February projects! What kinds of things are you punching lately?
Elizabeth
Wednesday, February 17, 2016
Double Recipe Challenge with Emma & Tara
Hi everyone, it's Tara and Emma here today! We have a couple layouts to share as well as a double challenge! I asked Emma if she would like to do a joint post with me and she had a great idea of giving each other a recipe challenge! One of my favorite challenges here at CTK is 3 To Inspire, so this was a fun one to do together. Join us and try out our recipe challenge!
Instead of using the same recipe, we surprised each other and both had some great ideas! Emma definitely pushed me beyond what I normally do in my Pocket Life pages. I was so excited to take the challenge. Emma's prompts were to:


Since I don't own many circle punches, I used a hole punch to create tiny circles to add here and there, adding a little more color and circles.

I punched out one large circle and added another tiny circle and a cork piece from the kit. I even used a white gel pen to create "xx faux-stitching" on the teal circle.

I wanted to tie in the circle theme and the heart patterned paper was the perfect touch to my photo! I had so much fun working with Emma and being challenged in new ways. It's so great to try other techniques or work outside of my comfort zone to create a fresh and new layout.
I was super excited when Tara asked if I'd like to do a joint post with her this month - it's always fun to work on a post with someone else from the Design Team! I was even more excited when we came up with the idea to give each other a 3-part recipe challenge - I would give Tara hers and she would give me mine! I'm a big fan of any type of recipe challenge (like our 3 To Inspire weekly challenge!). I don't mind admitting I was a litttttle nervous about what my recipe would be and Tara did not disappoint, she gave me some awesome challenges - my criteria were to:
Here's the page I finished up with:

And my first thought when I look back at this is - the background paper - so much yellow! Haha, Although you'll notice I couldn't help but add a white border around the outside...had to include a little bit of my "norm" into the mix. This paper was one of my favourites from the kit and I had intended to use it differently but I'm kinda loving this page - it's different to my usual style and that's what I find so fun! I used the February Main and Add-on kits for this page (plus I picked a label from my stash).


I even included one of the embellishment's I created for yesterday's tutorial post!

As I mentioned, I had so much fun with Tara's challenge! As nervous as I was, I had a ball working with things that I normally wouldn't - it was like a breath of fresh air! If you can, pair up with a buddy (or group of buddies) and give each other your own recipe challenge - I promise you'll love it!
Instead of using the same recipe, we surprised each other and both had some great ideas! Emma definitely pushed me beyond what I normally do in my Pocket Life pages. I was so excited to take the challenge. Emma's prompts were to:
- use stitching,
- hand-cut letters,
- and circles.

I had a hard time committing to which style of pocket page I wanted to go with. In the end, I really am happy with the final layout!

I LOVE the exclusive CTK patterned paper in this month's Pocket Life Kit! I used it to create the "Dream" cut out. I had grand plans to add a lot more stitching but I felt just a few pops here and there were perfect! I also re-purposed one of the 4x6 jounaling cards in the kit and made it a 3x4 card for my title. The puffy sticker on the letter "a" ties into the challenge too.


I punched out one large circle and added another tiny circle and a cork piece from the kit. I even used a white gel pen to create "xx faux-stitching" on the teal circle.

I wanted to tie in the circle theme and the heart patterned paper was the perfect touch to my photo! I had so much fun working with Emma and being challenged in new ways. It's so great to try other techniques or work outside of my comfort zone to create a fresh and new layout.
Here is Emma's layout and her take on my recipe challenge for her. She did a fantastic job!
-------------------------------------------------------------------------------------------------------------------
I was super excited when Tara asked if I'd like to do a joint post with her this month - it's always fun to work on a post with someone else from the Design Team! I was even more excited when we came up with the idea to give each other a 3-part recipe challenge - I would give Tara hers and she would give me mine! I'm a big fan of any type of recipe challenge (like our 3 To Inspire weekly challenge!). I don't mind admitting I was a litttttle nervous about what my recipe would be and Tara did not disappoint, she gave me some awesome challenges - my criteria were to:
- use my own handwriting,
- incorporate either 3x4 sized photos or paper on my layout,
- and use a bold/bright patterned paper for my background
Here's the page I finished up with:

And my first thought when I look back at this is - the background paper - so much yellow! Haha, Although you'll notice I couldn't help but add a white border around the outside...had to include a little bit of my "norm" into the mix. This paper was one of my favourites from the kit and I had intended to use it differently but I'm kinda loving this page - it's different to my usual style and that's what I find so fun! I used the February Main and Add-on kits for this page (plus I picked a label from my stash).


I even included one of the embellishment's I created for yesterday's tutorial post!

As I mentioned, I had so much fun with Tara's challenge! As nervous as I was, I had a ball working with things that I normally wouldn't - it was like a breath of fresh air! If you can, pair up with a buddy (or group of buddies) and give each other your own recipe challenge - I promise you'll love it!
-------------------------------------------------------------------------------------------------------------------
Don't you think this challenge was super fun and easy too? We definitely thought so - we had such a blast, Emma and I would do it again in a heartbeat! We would love to see your take on either recipe or even a mash up of the two! Please upload your layout to the Gallery and/or share it on the Facebook Fan Page.
Thank you for stopping by and have a fab day!
Xxo,
Em & Tara
Subscribe to:
Posts (Atom)